This section describes setting up online contribution forms where visitors to your website can make donations to your organization. This feature is very flexible and includes many optional fields and features such as recurring contributions, pledges, and personal campaign pages. These can make setting up contribution pages seem like a daunting task. It can be quite simple though as shown by the first two procedures.
Setting up a simple contribution page 
- Make sure you have already done your initial contribution setup and you have already integrated your payment processor
- Go to Contributions > New Contribution Page.
- Enter the title of the form for your website page.
- Select the appropriate financial type.
- Link this contribution page to a campaign. (optional)
- Compose your introductory message. (optional)
- Compose your footer message. (optional)
- Set a goal amount. (optional)
- Choose whether or not to accept Honoree soft crediting.
- Choose to use a confirmation page where users can check all details are correct or to process the payment as soon as the contribution form is submitted.
- Choose whether or not to display social media links on online pages and in the automatically emailed receipt (if being sent).
- Decide whether or not to make the Contribution Page active now.
- Click on Continue. (This is when your new contribution page is first saved.) You will be able to go back and modify all aspects of this page at any time by visiting the Title (and Settings) tab. You will now be on the (Contribution) Amounts tab. All the other feature tabs for contribution pages will now be visible at the top of the page.
- On the next page leave everything as is except for ticking the Allow Other Amounts checkbox and setting minimum and/or maximum amounts if you want to.
- Click on Save and Done.
- You can now grab the link to your form at any time by going to Contribution > manage contribution pages
- To the right of your contribution form title, Click on Links > Live Page
- To the right of your contribution form title, Click on Links > Live Page
Enable Automatic Receipts
- Navigate to your contribution form's configuration page
- Contribution > manage contribution pages
- To the right of your contribution form title, Click configure > title and settings
- Select the Receipt tab.
- Enter the title for your Thank-you page.
- Tick Email Receipt to Contributor.
- Enter the FROM email address in Receipt From Email.
- Click on Save and Done.
Embedding forms into your website
- Use the following code to embed your form into your website
<iframe src=“PASTE FORM URL HERE” style="border:0px #ffffff none;" name="myiFrame" scrolling="no" frameborder="1" onload="window.parent.scrollTo(0,0)” marginheight="0px" marginwidth="0px" height="1500px" width="600px" allowfullscreen></iframe> - Replace "PASTE FORM URL HERE " with the URL to your form.
- Default height and width are set to height="1500px" width="600px", you might need to play with the sizes to fit your site.
Watch the Tutorial
Delving Deeper
Amounts tab
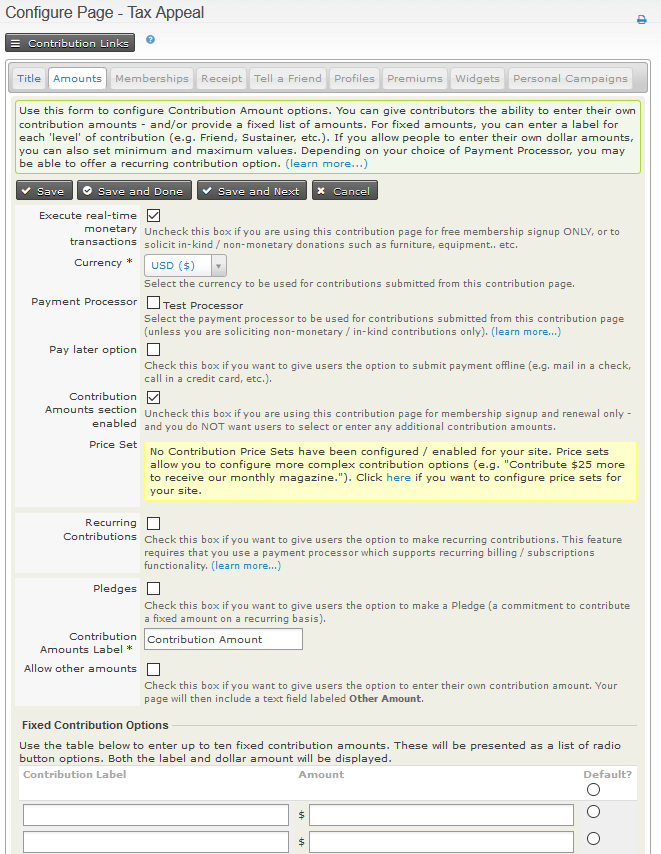
- The Execute real-time monetary transactions box is checked by default. You would uncheck this box if you are using this contribution page for free membership signup or to solicit in-kind (non-monetary) donations, or when you want all users to submit their payments offline.
- Select the Currency.
- Select one or more previously configured Payment Processors for this page. Some organizations find it is a good idea to offer a choice of processors. You can do this by setting up multiple processors and checking the corresponding boxes on this form.
- Check the Pay Later box if you want to give users the option to submit payment offline (e.g. mail in a cheque, call in a credit card, deposit directly into your bank account etc.). If you allow pay later contributions you will need to decide on a checkbox label to display to your users and the instructions for submitting these delayed payments.
- If you uncheck the Contribution Amounts Section Enabled the remaining fields on this page will vanish. You will only be able to accept fixed-amount membership fees, or, if you configure a membership price set, fixed-amount memberships fees and other contributions as specified in the price set all charged in a single transaction.
- Select a pre-defined Price Set (for more complex payment options), OR enter up to 10 fixed contribution amounts in the table at the bottom of the page.)
- You can check Recurring contributions. (There are restrictions on recurring payments when membership fees are being paid.) If you check Recurring contributions further settings become visible.
- You can either set one frequency (e.g. a user can donate their chosen amount monthly) or allow for more user flexibility, where they can decide their own interval and/or a number of installations (e.g. a user can donate their chosen amount once every three months for 12 installments).
- Check the Pledges box to give users the opportunity to pledge future payments.
- Decide on the label for the Contribution amount area on your page.
- Check Allow other amounts to give users the option to pay any amount they choose. You can set a minimum and a maximum amount for "Other Amount" contributions if you want to.
- Click Save and Done.
Memberships tab
This is covered in detail in Memberships.
Profile tab
If you want to collect information such as age, interests, and skills that go beyond the essential fields required to make a contribution, you can include existing CiviCRM Profiles at the beginning or end of a contribution page. You can also create new profiles.
Each profile appears on the contribution page as a fieldset with a legend header. The legend will be the profile Public Title if that is set, or else the Profile Name. A good practice is to give profiles names that are useful for identifying profiles in a list and to give profiles public titles that make a good header for the form section.
Profiles used in a contribution page can ONLY contain fields which belong to:
- contact records
- contribution records
Profiles which include fields associated with any other record types will not be available for this purpose.
Contribution pages will always include a required email address field. If you do not include any profile with an email address field, an email address field will be added near the top of the form.
To add a profile to a contribution form:
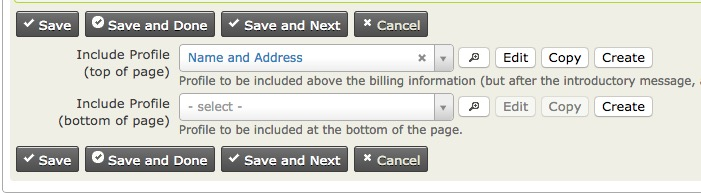
- Navigate to Manage Contribution Pages then for the page you wish to configure, click on Configure > Include Profiles.
-
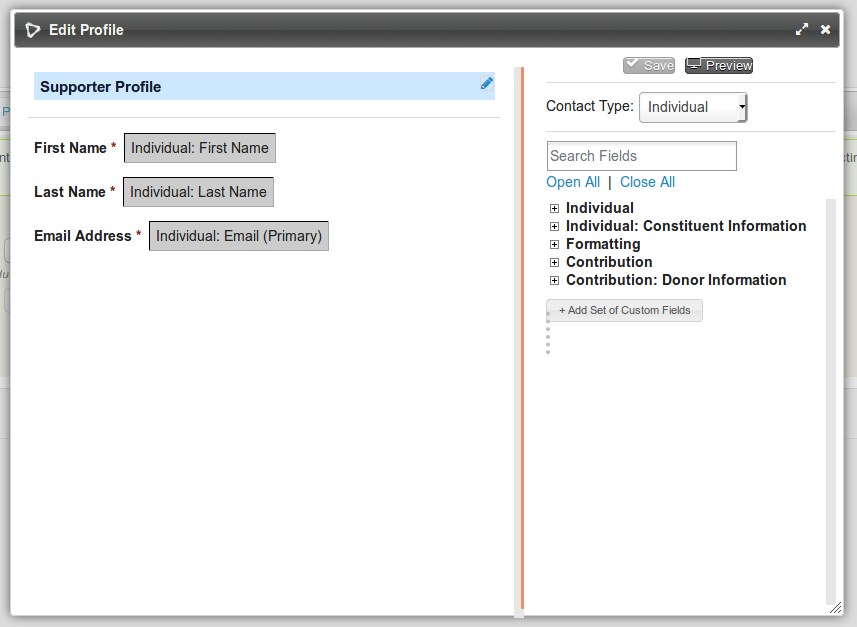
Select a profile from the dropdown menu to be included at the top of the contribution page and/or at the bottom of the page. You can then preview your selection(s), edit an existing profile, copy an existing profile or create a new profile. When you edit or create a new profile you will use the profile drag and drop interface pictured here. You may click the pencil icon to edit the profile name, public title, and pre- and post-form help text.
 Warning!
If you modify an existing profile whilst configuring your Contribution page, the changes you make will apply everywhere that profile is being used. So unless an existing profile exactly matches your requirements you should copy the profile, then rename and edit the copy as required. -
Click Save or Save and Done or Save and Next.
Multiple address blocks
Most payment processors add a set of address fields along with the payment details. These fields will be used to save a billing address.
If you include a profile with address fields at the top of the page, the CRM automatically generates a checkbox on the contribution form which allows the user to indicate that their Billing Address is the same as the address entered in the profile. (If the profile is included at the bottom of the page, this checkbox will not be generated).
A number of the Advanced Settings for profiles take effect when a profile is included in a contribution page. You cannot edit these from the editing interface within the contribution page settings; you must go to the main profile settings form to make changes.
- Adding contacts to a group. Note that many donors do not wish to join a mailing list merely because they have made a donation.
- CMS User account registration options. A donor can be presented with the option or requirement to log in or create a user account while making a contribution.
- Including ReCAPTCHA. A CAPTCHA can be added to make it more difficult for bots and donors to submit the form.
Other advanced settings, such as what to do upon duplicate match, are ignored on contribution pages.
For more information read Profiles.
Automatic Contribution Recording
Regardless of how donors get to your contribution page, CiviCRM automatically records their donations, freeing your staff from doing manual data entry. If the donors already exist in the database, CiviCRM adds the contribution to their existing record. If they don't exist, CiviCRM creates a new record for them.
In situations where people have multiple email addresses, or where more than one person shares an email address, it can be possible for contributions to be credited to the wrong contact. To mitigate the chance of this happening, you can adjust CiviCRM's default duplicate matching rules. For instructions on how to do this, read Deduping and Merging.
Receipt Tab Thank-you and Receipting
Once you have created your contribution page, you can customise the Thank-you and Receipt emails that are sent to contributors.
- Navigate to Administer > CiviContribute > Manage Contribution Pages.
- Use the Configure link at the right-hand side of a contribution page in the list to access and edit the page.
- Click on Thank-you and Receipting and enter the information that you wish to appear in the thank-you email. Donors usually expect a receipt as soon as their transaction is complete, so it is recommended to enable the automatic Email Receipt.
- Click Save and Done.
Publicizing your contribution page
Now that you've created your contribution page, it's time to bring people to the page so they can contribute. You will probably want to display a link to the page prominently on your website through a donate button or menu item. Here are some additional tips for promoting a contribution page in different CiviCRM configurations:
Personalized Email
Emailing your current contacts is the other critical way to publicize a fundraising campaign. The Mailing component allows you to send targeted emails to any group of contacts in your database. Within a message you can include links to the contribution form and use the Mailing's tracking capability to see how many people click on that link.
One time-tested way to increase contributions is to use checksum tokens to send each constituent a personalized email with a link to the contribution form that has all of their contact information already filled in. This saves them the hassle of filling it out and raises the chances that they donate.