Smart groups are 'saved searches'. They are useful for keeping track of groups of contacts that meet certain criteria, for example 'all contacts who donated more than $500 last year and live in California'. Creating a smart group is easy: you search based on your desired criteria and then choose 'Create smart group' from the action menu. Once the smart group is created, each time you ask to see the contacts in a group, the CRM will carry out a search and show you contacts that meet the criteria you specified.
Smart groups are really powerful and useful. They come in handy in many different situations. Spend some time making sure you understand smart groups and how you might be able to use them.
When might I use a smart group?
Smart groups come in handy in many different situations. Here is an example.
Smart groups as mailing lists: an events newsletter
Let's assume that anyone who has registered for or attended an event will want to receive our events newsletter. We can create a smart group with that includes all people who have registered or attended an event, and specify that this smart group is a mailing list. It will then be available for use and we can use it to send the events newsletter. As people register to attend an event - or are marked as having attended an event - they will be added automatically to the smart group and hence subscribed to the newsletter. Smart groups respect people's subscription preferences. If people unsubscribe from the newsletter, they will be removed from the smart group.
Creating smart groups
Smart groups can be created from any search results. Let's say we wanted to create a smart group of all donors who have not yet been sent a thank-you letter to help us manage our work-flow for thanking donors. As we send letters, the donors receiving them will automatically leave the smart group, allowing us to have an always accurate list of people to send letters to.
We can use the advanced search to create this smart group.
- Go to Search > Find Contacts > Advanced Search.
- Scroll down to the Contributions section.
- Check Thank-you date not set? and choose Donation from the financial type drop-down menu.
- Click Search at the bottom of the page.
- Select all records
- From the Actions drop-down menu select Group - create smart group.
- Give the smart group a name and description and optionally designate it as a mailing list and give if a parent group. Click Save Smart Group.
Your smart group will now appear in all the usual places where you see groups.
Try editing the contact in the smart group so that they no longer match the criteria. You'll see that they are removed from the smart group.
Note: The contact is not removed immediately. To keep things running smoothly, smart groups are updated every 5 - 15 minutes.
Changing criteria for smart groups
You may want to refine the criteria that your smart group uses to select contacts. For example, you may want to edit a smart group consisting of all current members to include new members as well. You can do this from the Manage groups screen.
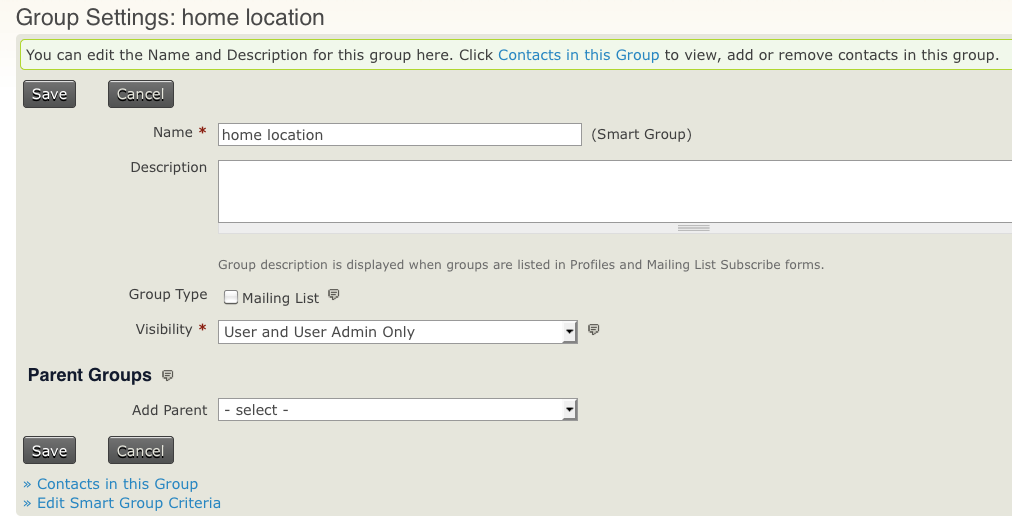
Click Manage Groups. To edit the search criteria of a particular smart group, click Settings next to that group.

On the group settings screen, click Edit Smart Group Criteria at the bottom left.
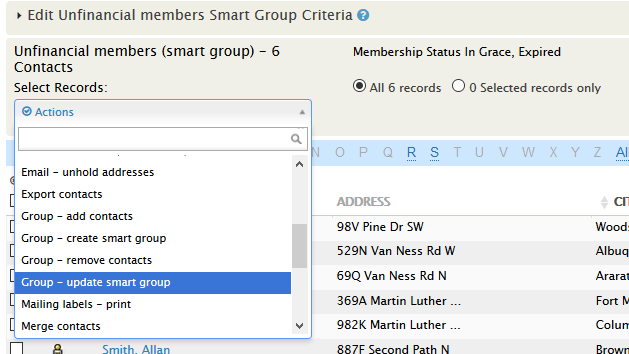
This will bring up a screen similar to the one that you originally used to create the smart group with the search results displayed. Clicking on the bar at the top of the screen will bring up the criteria that you used to define the smart group. You can then update the criteria and once you're happy with the results, select all records and choose Update Smart Group from the Actions list.
Your smart group is now based on the new criteria.
Adding and removing smart group members manually
By default, smart group membership is determined by the criteria outlined in the smart group settings. However, you can override the criteria by manually adding or removing contacts from the group. You can manually add contacts to a smart group using the same workflows you would use to add contacts to a standard group. If you navigate to the Groups tab on an individual's contact record, you won't have the option to Remove via a button the same way you would for a standard group. However, you can manually remove someone from a smart group by going to Contacts > Manage Groups. Select Contacts on the right-hand column of the chosen group to view all of the contacts currently within the group. Find and check the box next to the contact you want to remove. Use the Actions dropdown and select Group - remove contacts. Confirm the removal and the group record will now show up under Past Groups for that contact. The CRM will override the smart group criteria based on manual adds or removals, even if there is a change in a contact's eligibility for inclusion based on that criteria.
Once a contact has been removed from a smart group, there will be an option to Delete their smart group record under the Groups tab on their contact record. If you Delete the record, they will again be subject to smart group inclusion based on the set criteria.